
(866) 934-9349
Seller Net Sheet - Branded Title Insurance Rate Calculator at your Fingertips
  • Features
  • Pricing
  • Request a Demo
Select Page
document check mark

Getting Started

5
  • How to Add or Import Realtor customers into your Net Sheet Calculator
  • How to Create an Account
  • How To Download the App for Android
  • How To Download the App for iPhone
  • Brandable ClosingTap Calculator App Instructions (.DOCX)
gears icon

Troubleshooting

2
  • Calculator Screen Font
  • I can’t Login to My Calculator/App
envelope and paper icon

Marketing

9
  • How to Add or Import Realtor customers into your Net Sheet Calculator
  • How can I tell which clients are using my title quote or refinance calculator?
  • Co-Branding Your Net Sheet Calculator for your Agents and Marketing Representatives
  • Email Announcement/ Newsletter to Your Customers, Part 2
  • Email Announcement/ Newsletter to Your Customers, Part 1
  • Receptionist and Closer Script (Phone)
  • Signature graphic and download link
  • Add an email signature in Outlook (2007-2010)
  • Add an email signature in Outlook (Newer Versions)
calculator icon

General

13
  • How to generate a PDF from my net sheet or refinance calculator?
  • Billing Notifications to Multiple Email Addresses
  • Using QR Code Readers with NetSheetCalc
  • How to Change Your Password
  • How to Order a Title
  • How to Edit Your Account Info
  • How to use QR code reader
  • How to Email a Preliminary Closing Statement
  • How to Access Previously Saved Preliminary Closing Statements
  • How to Save and/or Discard Drafted Closing Statements
  • How to Print a Preliminary Closing Statement
  • How to Create a Preliminary Closing Statement
  • CLOSINGTAP VS SMARTGFE AND CLOSINGCORP
pencil writing icon

Customizations

6
  • Changing locations or offices within your title quote calculator
  • How to reorder your calculators, sections and fees on your Net Sheet Calculator
  • How to customize your closing quote calculator notifications your clients receive
  • How to Add or Import Realtor customers into your Net Sheet Calculator
  • How do I customize my call-to-action buttons within my calculator?
  • How do I update my fees in my net sheet or refinance calculator?
View Categories
  • Home
  • Docs
  • Marketing
  • Add an email signature in Outlook (Newer Versions)

Add an email signature in Outlook (Newer Versions)

3 min read

Create your signature and choose when Outlook adds a signature to your messages #

Important: If you have a Microsoft Office 365 account, and you use Outlook and Outlook on the web or Outlook on the web for business, you need to create a signature in both products. To create and use email signatures in Outlook on the web, see Create and add an email signature in Outlook.com or Outlook on the web.

If you want to see how it’s done, go directly to the video here.

    1. Open a new email message.
    2. Message menu, select Signature > Signatures.
      Depending on the size of your Outlook window and whether you’re composing a new email message or a reply or forward, the Message menu and the Signature button might be in two different locations.


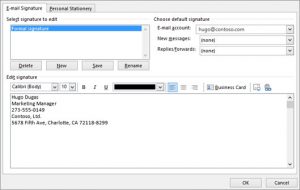
    3. Under Select signature to edit, choose New, and in the New Signature dialog box, type a name for the signature.
    4. Under Edit signature, compose your signature. You can change fonts, font colors, and sizes, as well as text alignment. If you want to create a more robust signature with bullets, tables, or borders, use Word to format your text, then copy and paste the signature into the Edit signature box. You can also use one of our pre-designed templates for your signature. Download the templates in Word, customize them with your personal information, and then copy and paste them into the Edit signature box.
      NOTES:

      • You can add links and images to your email signature, change fonts and colors, and justify the text using the mini formatting bar under Edit signature.
      • You can also add social media icons and links in your signature or customize one of our pre-designed templates. For more information, see Create a signature from a template.
      • To add images to your signature, see Add a logo or image to your signature.
    5. Under Choose default signature, set the following options for your signature:
        • In the E-mail account drop-down box, choose an email account to associate with the signature. You can have different signatures for each email account.
        • If you want your signature added to all new messages by default, in the New messages drop-down box, select one of your signatures. If you don’t want to automatically add a signature to new messages, choose (none). This doesn’t add a signature to any messages you reply to or forward.

      If you want your signature to appear in the messages you reply to and forward, in the Replies/forwards drop-down, select one of your signatures. Otherwise, accept the default option of (none).

  • Choose OK to save your new signature and return to your message. Outlook doesn’t add your new signature to the message you opened in Step 1, even if you chose to apply the signature to all new messages. You’ll have to add the signature manually to this one message. All future messages will have the signature added automatically. To add the signature manually, select Signature from the Message menu and then pick the signature you just created.
Updated on May 18, 2021

Was this helpful?

  • Happy
  • Normal
  • Sad

Share This Article :

  • Facebook
  • X
  • LinkedIn
  • Pinterest
Add an email signature in Outlook (2007-2010)How to Add or Import Realtor customers into your Net Sheet Calculator
Table of Contents
  • Create your signature and choose when Outlook adds a signature to your messages
NetSheet Calculator Logo

Quick Links

  • Home
  • About-2022
  • Request a Demo-2022
  • Knowledge Base

Resources

  • Blog
  • Net Sheet Calculator by State
  • Title Insurance Cost by State
  • Underwriter Calculators
  • Privacy Policy
  • Terms & Conditions

© Copyright 2026 Example Company Nine | TitleTap - Websites for Law Firms and Title Companies | Privacy Policy