
You can create personalized signatures for your email messages that include text, images, your electronic business card, a logo, or even an image of your handwritten signature.
NOTE: This article is for Microsoft Outlook 2010. This information is also available for Microsoft Office Outlook 2003 and Microsoft Office Outlook 2007.
Your signature can automatically be added to outgoing messages, or you can manually add the signature to only the messages that you choose.
Create a signature #
-
- Open a new message. On the Message tab, in the Include group, click Signature, and then click Signatures.
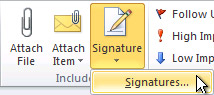
- On the E-mail Signature tab, click New.
- Type a name for the signature, and then click OK.
- In the Edit signature box, type the text that you want to include in the signature.
- To format the text, select the text, and then use the style and formatting buttons to select the options that you want.
- To add elements besides text, click where you want the element to appear, and then do any of the following:
Options How to To add an electronic business card Click Business Card, and then click a contact in the Filed As list. Then click OK To add a hyperlink Click  Insert hyperlink, type in the information or browse to a hyperlink, click to select it, and then click OK
To add a picture Click  picture, browse to a picture, click to select it, and then click OK. Common image file formats for pictures include .bmp, .gif, .jpg, and .png.
 - To finish creating the signature, click OK.
NOTE: The signature that you just created or modified won’t appear in the open message; it must be inserted into the message.
- Open a new message. On the Message tab, in the Include group, click Signature, and then click Signatures.
Add a signature to messages #
Signatures can be added automatically to all outgoing messages, or you can choose which messages include a signature.
NOTE: Each message can contain only one signature.
INSERT A SIGNATURE AUTOMATICALLY
-
-
- On the Message tab, in the Include group, click Signature, and then click Signatures.
- Under Choose default signature, in the E-mail account list, click an email account with which you want to associate the signature.
- In the New messages list, select the signature that you want to include.
- If you want a signature to be included when you reply to or forward messages, in the Replies/forwards list, select the signature. Otherwise, click (none).
- On the Message tab, in the Include group, click Signature, and then click Signatures.
-
INSERT A SIGNATURE MANUALLY
In a new message, on the Message tab, in the Include group, click Signature, and then click the signature that you want.
TIP: To remove a signature from an open message, select the signature in the message body, and then press DELETE.


